Showing posts with label How to. Show all posts

Friday, 9 December 2011

Christmas Wreath for under $10


No, wait, it gets better.  All the items I bought brand new at Spotlight (a haberdashery and craft store here 'down under'), the only items I had at home was my hot glue gun (and glue of course) and a few extra baubles.  I guess Spotlight was having a sale or something 'cause I got everything C.H.E.A.P.

Wreath $7  $3.50
2 metres of ribbon $0.96
16 pc ornament set $2.50  $1.25

Total cost $5.71

I should re-label the heading as Christmas Wreath for a tad over $5.00

I am loving the customised look for much cheaper than mass produced.

This was a project I did with Little Angel.  And when you're three, there is no time to wait, so I didn't get great photos of the during - who am I kidding, I didn't get any.  Here is a rushed before photo.


Little Angel picked the ornaments to glue, I applied the glue to the back of the ornament, and with Little Angel being very careful, she applied the ornament to the wreath (with a little guideance from me).

We measured the ribbon length and tied and glued it to the wreath (the knot is hidden at the back of the wreath). 


We then made a bow, and glued it to the front. 


We installed it to the door using an upside down Command hook on the inside of the door.


By the way I picked up some 12 clear glass baubles for $5.00. I am not sure what to do with them yet, but I love some of the looks that people are coming up with in blog land.


Linking here to these awsome blog parties


Wednesday, 30 November 2011

Master Bedroom Light


A week or so ago, I was walking through Bunnings (a home improvement/hardware store) and was blinded by bling.  Unfortunately I only had my phone with me, and the photos don't do justice as to the amount of sparkle theses light fittings had but let me just say I needed sunglasses!


Although not a bad price at $169, I decided that I could make one cheaper.  So I used the above photos as inspiration.  Walked down the aisle a bit and found myself a drum shade for $25.

Before, I go on I want to show you what I had before.


Yes, there it is the $5 plastic shade from the builders. 

I had upgraded to this shade, which I bought, and loved.  In fact I still love it, it was just too small for the space.  It is now in the main toilet, and looks great there I must add. :-)


And, so onto the drum shade.  It fits in the space beautifully

 And I love the linen texture.


I slept on this for a day or two trying to figure out what I was going to hang chrystal beads off.  Then I remembered I had a perfectly good shade on a disgraceful brass touch lamp (that was broken - the base had come apart).


I dismantled the shade.


and attached the left over rings to my drum shade with wire.

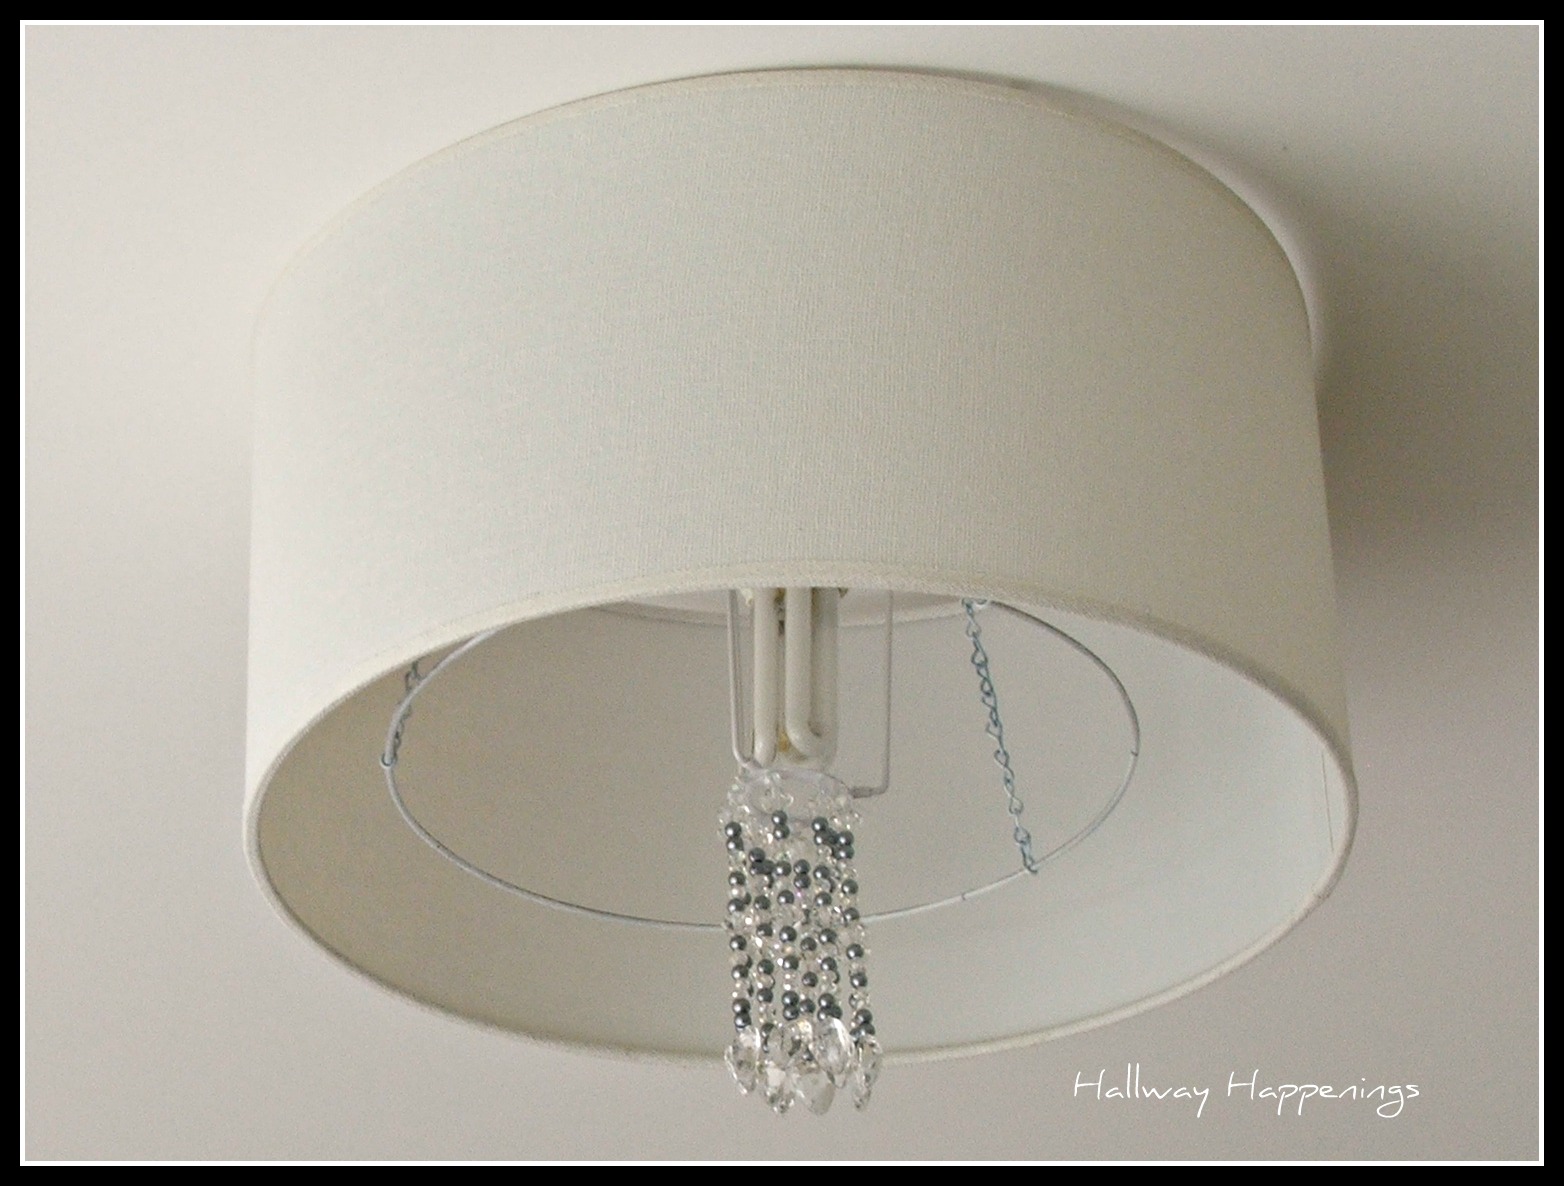
The wire I decided looked ugly.  I ended up buying 1 metre of chain and spray painted the rings and chain white.  I then attached that to the drum shade.  I ended up turning what would have been the top of the dismantled light, upside down.  I don't have any pictures, but I strung my own beads with fishing wire and attached these to the centre ring. 

I bought the beads from Spotlight (a crafting store) (for about $40) and asked assistance from the staff, on how to best string the beads, the were very helpful.  But I am sure if you google stringing beads or jewelry making, you would find some helpful tutorials.


I'm not sure that I liked the look of my light fitting at this point, but I hadn't done anything that couldn't be removed.  I wanted to do something similar to the outside ring, as per my inspiration light fitting, and have lots of chrystals dangling down.  But it was going to cost me a small fortune to buy all the beads, and it would have been cheaper to buy the inspiration light fitting.  Hmmmm

I could buy some necklaces.  As it happened I walked into a charity shop today and found a necklace that had some beads, but not enough for what I wanted.  For $7 I bought the necklace and decided I would just keep my eyes open for more beads.

In the meantime, I got thinking, because the necklace had chain links, then rather than restringing the beads, I could somehow attach the chain to my light.  I draped the necklace over the outer ring, just to see how it would look...


 ... and that is where it stayed.  I think it looks great.


Inspriation Light ($169)

 My Original Version ($72) Which could be done cheaper if you had lots of costume jewelry floating around.

I just hope Hubby likes the bedroom bling 

Linking to these awsome blogs here

Sunday, 20 November 2011

Girls Bedroom Light Fitting

Below is the original light fitting that the builders put in the house (in all the rooms).  I was saddened to find that they are plastic and sold at the local hardware store for $5 each (no expense spared on the builders behalf!!)  It has since been my mission to replace these light fittings with something original that I love (without paying a fortune).


I was inspired by the below photo on pinterest,


and after tackling this light fitting project, I was keen to give the birdcage a go.

I picked up a fake birdcage at "The Reject Shop" for $10.  Unfortunately, like most of my projects, I didn't get before photos of the cage, because I just wanted to get started, but essentially the birdcage remains the same, just with a hole in the bottom now. I used the old light fitting as a template, to draw a circle in the middle.   And from that moment on, this is what my thought process was like... Can I drill a hole in the bottom of the cage?  Oh, yes I can.  Well how close do I need to drill the second hole to make it easy to cut the metal?  Oh, not that, close.  Better drill another hole, oops too far apart.  Any way seventy billion holes and a pair of wire cutters later, I had a large hole cut out of the bottom of the birdcage.  Its not perfectly round, and it's pretty rough round the edges, but it is a hole.


So then I thought, I will just see if it fits around the light. Yay, do a little happy dance, it does. 


I then added the butterfly by using a stenciling cutter and cutting out 3 butterflys in contrasting scrap paper, and gluing the middle together.  It not that hard, and I will take photos of how I did it when I make more (this one was an experiment).  Anyhoo, little angel has her own pet butterfly.


Today, I have changed up the light globe, as you can see in the above photo it was a spiral energy efficient globe, but I found an energy efficient globe that looks more like the conventional globe shape.  Love the look of this much better.

I have just cottoned onto DIY lightfittings, and I would love to see what you have come up with.  Please share your links, so I can stalk you :-)

Linking this project to these awesome here


Wednesday, 19 October 2011

How everything came together in the study

This is what I started with


I really didn't know where to begin.  But I was going to get rid of the desk and paint the bookcase.  So I found some mistinted paint at the hardware store and got to work on the bookcase. Moving it closer to the opening of the room, gave me more room to play with (so I could fit a bigger desk in).


Looking much better already. 

But, this is some of what I pulled off the bookcase...

Where did it all come from?? ?
I needed somewhere to put all this "stuff".  So I put up 2 rows of shelves.  Just 4 planks of wood on brackets.  Then painted them same colour as the bookcase.


In the meantime, I came across a filing cabinet and bedside cabinet to use as a base for the new desk.  These were painted the same colour as the shelves and bookcase.  And had new handles attached.  The desk was from the top of our old entertainement unit, and fitted the space next to the bookcase perfectly.  This was just lucky, I hadn't done any pre measuring.


Next came the chalkboard calander.

However the other side of the room still needed some work.


While I waited for the ideal desk to jump in my lap, I started to improve and purchase the accessories.


The second desk did "jump in my lap".  You can read about that here. 


And I have a study that I enjoy using, love looking at, and is a vast improvement on the eyesore we once had.


Friday, 9 September 2011

How to upholster the back of a chair.

Firslty what do you take on holidays?  I drove, so of course that means you can fill the car up just a little bit more.  Let me start off with the things I forgot.  I forgot my phone charger, socks and hairbrush.  But at least I remembered the important stuff, my drill, staple gun, and hot glue gun.  Due to my little stint in hospital I didn't get an opportunity to pull out the drill and hot glue gun, but they got to come on holidays anyway.  My staple gun worked harder than ever.


 So here is the before picture


There are four chairs.  All of them had arms to the side, but some were very damaged so we ended up removing two sets.

The seat base was easily covered and I haven't done a tutorial on how to do this, as there is lots of tutorials on the web (remember google is my friend).  The front of the back of the chair is covered in the same way as the base, however that leaves the back of the chair exposed.


Excuse the blurry picture, but you get the idea.

So now I will beging my tutorial on how to upholster the back of a chair.  Two things to remember, I staple from the middle to the outsides, as you can make adjusments at the corners if needed, and trim most of you excess material as this leaves a less bulky look.

Lets get started in three easy peasy steps.

Step 1. Attach the material to the top of the chair (wrong side out) so that you flip the material over the staples and they will be hidden.


Top row of staples hold the fabric in place.

When fabric is flipped over staples are hidden and leaves a neat edge.

Its important to keep all lines lined up, and the row of staples neat.  I try to staple as close to the top of the chair as possible, this give me the line of the chair back to follow. And remember keep flipping the material back and forth to make sure it is looking straight, its easy to remove a wayward staple at this stage (which I did about 3029 times).

Step 2 The sides
Continue stapling unitl you get need the end and turn the edge under and staple in place.


Looks like this with material flipped over.


 I then tend put one staple in the material at the base of the back.  This just keeps the material in place, and nice and straight while I work on the sides.


Then using a strip of fake nails I attach the sides with tacks


Thats my strip of fake nails, you can see the holes every fifth tack along to tack in the real tacks (is that too many tacks in one sentance??)


Remember to keep the material straight and tight.

Step 3 The base
Staple in place from the middle out, keeping the material tight, then cut to fit around the legs


Trim off excess material.  Turn chair upright and try to get your daughter off it for a photo.


The Before


The After


Better than a suntan??

I'm linking this here

Lovely Crafty Home


Funky Junk's Saturday Nite Special